Most people open a trail map looking for runs. They trace a blue line down the hill and only later notice they have no idea how to get to the top of it, or what the lift that goes there will be like. Lift symbols answer both questions. Once you can tell a chairlift from a gondola or a T-bar at a glance, you know where each lift goes, how you will ride it, whether you keep your skis on, and whether it suits a nervous first-timer or a child.
Start with the line, then the badge
On almost every trail map a lift is a straight line between two points: the bottom station where you load and the top station where you unload. Lifts run in straight lines because the cable does, so a straight line cutting across the curving runs is nearly always a lift. On MountainMap the line is red, with a small badge showing the lift type and the lift's name written along it.
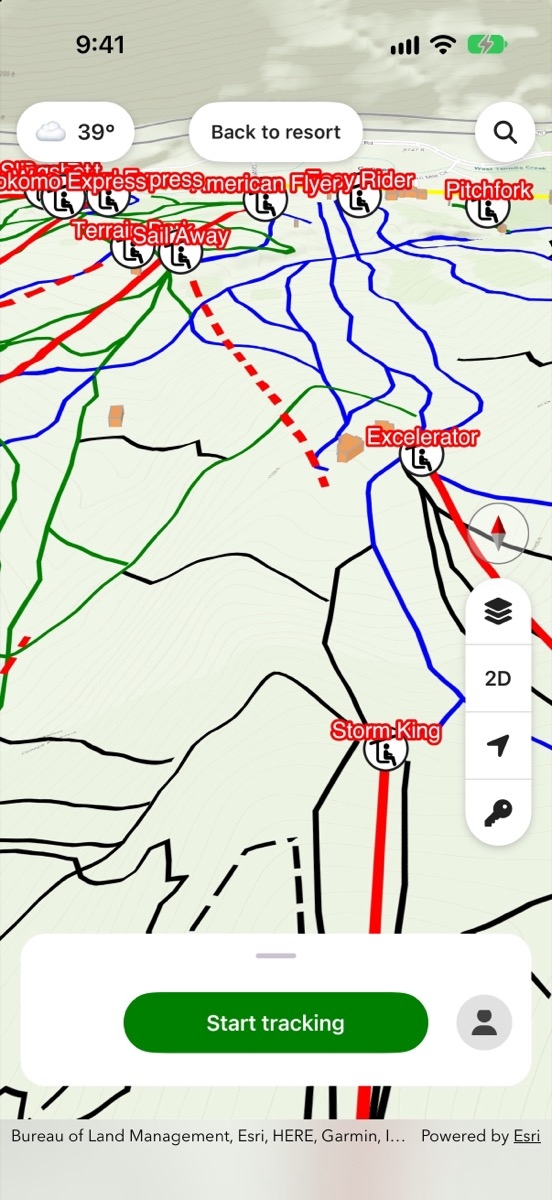
Read the line in this order. First, find which end is the bottom; it usually sits by a base area, a lodge or the run-outs of several trails. Second, read the badge to learn the lift type. Third, note the name, because that is what the sign at the loading station will say, and what ski patrol and your friends will use when you get separated.
Chairlifts: the default symbol
The chairlift is the lift you will meet most often, and it is usually shown with a small chair icon. You ride sitting down with your skis or board still on, a restraining bar overhead, and your feet dangling. Maps and lift signs often add how many people each chair holds, from doubles to six-packs, and whether it is a fixed-grip or a detachable lift. That detail matters: a detachable chair slows down at the stations so loading is gentler, while a fixed-grip chair keeps moving at full speed and asks you to be ready as it swings in behind you.
Look at the top end too. A chair that unloads onto a flat area next to green runs is a sensible first ride. A chair whose top station touches only black runs is not, however short the line looks.
Gondolas and trams: enclosed cabins
Gondolas and aerial trams are drawn with a cabin icon rather than a chair. You take your skis off, carry them in, and ride inside an enclosed car, which makes these lifts the easiest for beginners and the warmest on a cold, windy day. Gondolas use many small cabins circulating on a loop, so you rarely wait long. Trams use one or two large cars shuttling back and forth, so you wait for the next departure.
Alyeska Resort in Girdwood, Alaska, is a good example to study on the Alyeska Resort page. The Alyeska Aerial Tram listing from Visit Anchorage describes it as a 60-passenger cabin with a ride of 3 to 5 minutes. A cabin icon like that tells you before you leave home that you will be carrying your skis on board rather than wearing them.
Surface lifts: T-bars, platters and rope tows
Surface lifts pull you uphill while your skis or board stay on the snow. Maps mark them with their own icons, and the line is usually shorter than a chairlift's. The main kinds are:
- T-bar: an upside-down T hangs from the cable and two riders share it, the bar resting behind the thighs, not sitting on it.
- Platter or button lift: a single disc on a pole that one rider places between the legs.
- Rope tow: a moving rope you grip with your hands, common on small hills and beginner slopes.
- Magic carpet: a conveyor belt you stand on, found in learning areas.
Surface lifts surprise people more than any other lift type. You need to keep your skis in the track, stay standing and let go cleanly at the top, and snowboarders ride with one foot free. If you are new, a map with only surface lifts on a section of the hill is a sign to ask staff for tips before you load.
Reading the lift network as a whole
Once you can name each lift, read them together. Several lifts usually fan out from a base area, where the lodges, ticket office and patrol hut cluster. The lifts that start there are your first options of the day and your last route home.
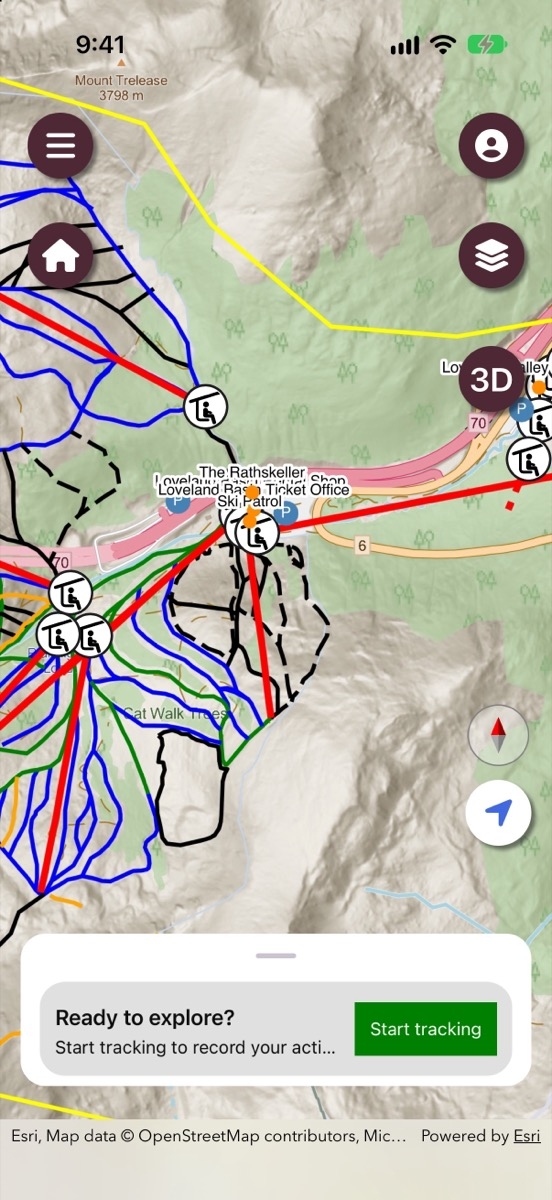
Then trace links between lifts. A top station that sits close to the bottom station of another lift means you can chain them to climb higher. A lift that starts mid-mountain can only be reached by skiing to it, so make sure there is a run at your level that gets you there. Smaller areas make this easy to practise: open the Arctic Valley Ski Area trail map or the Birch Hill Ski and Snowboard Area trail map, name every lift by its badge, and work out which runs each one serves.
Common mistakes
- Judging a lift by its length. A short line can end at a steep summit with no easy way down. Always check the colours of the runs at the top station.
- Ignoring the lift type. Beginners who find a chair intimidating may be happier on a gondola, and a T-bar can be harder than either.
- Mixing up lifts and runs. Straight lines with badges are lifts; curving coloured lines are runs. Never try to ski down a lift line.
- Forgetting closing times. Upper lifts often stop earlier than base lifts, so a route that relies on them can leave you stranded on the wrong side of the hill.
Next time you open a trail map
Before you look at a single run, find the base area and list the lifts that leave it. For each one, read the badge to learn the lift type and how you will ride it, follow the line to its top station, and note which run colours start there. Pick your first lift by what is waiting at the top, not by how short the line is, and remember the names so you can match the map to the signs on the mountain.
